
Outlook Data File Cannot Be Accessed: When you make a try to send email or receive email, you start facing an issue which says that outlook data file cannot be located. This outlook data file cannot be accesses message is occurred when we use outlook 10 or outlook 13 on windows 10 or in windows 8 as well. Sometimes this message becomes very annoying because it doesn’t allow the users to send or receive any type of message.
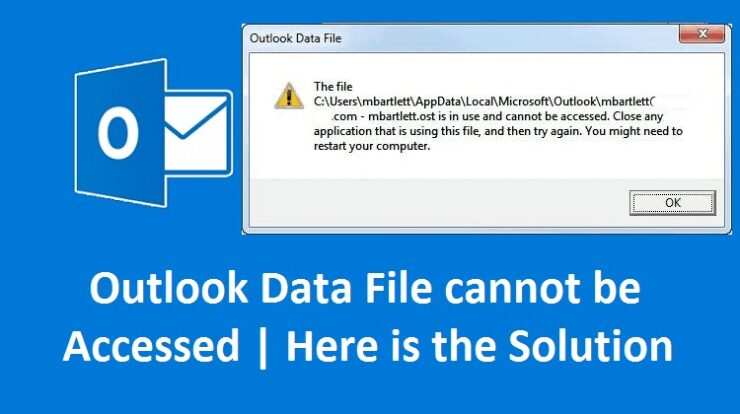
These types of errors comes in the middle of the sending email and pops up as “Error 0x8004010F: Outlook data file cannot be accessed”. This error takes place when the outlook profile has got corrupted or when you transferred your Outlook.PST file.
If you have lost your admin privileges then you need to create a new admin account. You can use any type of 3rd party tools which help you to get or reset administrator privileges on windows 10.
Outlook Data File Cannot be Accessed – What is Outlook?
As you already knows that outlook surfaces many different types of sending’reported error (0x8004010f) : ‘Outlook data file cannot be accessed.’ error which is basically comes in the alphanumeric form of individual code along with a message which is about the error occurred. The error unable to send email outlook data file cannot be accessed is one of the most common error message which takes place when we perform different types of activities like sending or receiving emails.
Also, repairing of corrupted OST file saving it as a PST file is one of the best solution of resolving the Outlook data file cannot be found the error. But apart from this, there are lots of solutions available which help you to fix the error of outlook file cannot be opened in trouble.
Possible Reasons for 0x8004010f Outlook 2021 error- We Couldn’t Create the Outlook Data File
There are lots of issues like we couldn’t create the outlook data file which interrupt the Outlook from sending or receiving a file which is as follows:
- Outlook PST data files are located at the wrong place
- Outlook data files are moved to a different location
- After upgrading the current outlook, the file is corrupted
- Outlook profile is not being tested
Also Read: IMVU Sign Out
Fix Outlook Data File Cannot Be Found Error
So, let’s start with the different methods of Outlook Data File Cannot be Accessed Error which was very easy to follow and also which help you to follow the problem of Outlook data file cannot be opened error. So simply go through with the below given methods and solve this error.
Method 1 – Keep Profile Method
- Firstly, you need to open the outlook and then go to the option of Account Settings.
- Now, you need to go to the email tab and then highlight the account with the problem. After this, make a click on the option of “Change Folder”.
- After this, you need to make a click on the New Outlook data file and then create a temporary data file.
- Then, you need to enter a new name for your data file and then make a click on the OK button.
- Now you need to expand the folders and then select the inbox. After this make a click on the Ok button to close the dialog box and then go back to the Account Settings.
- Then, in the Account Setting option, you need to make a click on the option of “Change folder”.
- After this, re-select the correct data file and folder which you want for your email message and then make a click on the “Ok” button.
- Now, you need to switch back to the data files and the simply remove temporary PST file from the folder.
- Then, simply close the dialog box of the account settings and then make a click on the option of send or receive option.
So, with the help of above given easy methods, you are able to fix the outlook data file cannot be opened error.
Method 2 – Locate the Default Outlook Data File
- Firstly, you need to make a click on the start button. After this, in that you need to click on the option of “control panel”.
- Then, in that you need to make a click on the option of “mail”.
- In that mail set up outlook dialog box and then tap on the click “Show Profiles”.
- In that, you need to select the current outlook profile and the make a click on the option of “Properties”.
- Then in the dialog box of mail set up Outlook and then make a click on the option of data files.
- After this, in the account settings, a dialog box then select the files of data, Note down the actual name and the location of the default data file for your profile.
- Now, simply make a click on the close option.
So, finally the above given steps help you to quickly fix the outlook data file cannot be accessed error in no time. All the above given steps help you to fix the issue with any of outlook version which is 2017 or 2013.
Also Read: www.activatespeedtalk.com
Method 3- Create a New Profile
This is one of the advance fix method which you can try to fix the issue of outlook data file cannot be opened error. So, simply read the below given step by step guide which help you to fix this outlook we couldn’t create the outlook data file error.
- Firstly, you need to create a new profile for this, you need to go to the control panel and then search for the mail.
- After this, simply open the dialog box and then in that make a click on the option of “Show Profile”.
- Then, you need to make a click on the option of “Add to create a new profile” option. When the profile is created with a new name, then simply delete the old profile.
- To add an account to your profile, you need to use the account auto setup option. Or also in the new profile dialog box, you need to type a new profile name and then make a click on the “ok” button. After this, in the “Add new account” box, you are required to enter a valid email id and then you need to enter your account information.
- After this, make a click on the “Next” button.
- If you are using POP3 then to add the account, you are required to make a tick on the change account setup option and then make a click on the “Next” button. This option will you the access to use the old PST data file.
- Now, you need to select the old data file and then simply make a click on the exit button of the dialog box.
- When you complete the account configuration process, then make a click on the “Next” button to complete the process.
- After this, simply restart the Outlook.
When you make a restart, then simply sit back and relax as the Outlook data file can’t be accessed error is fixed. And within sometime you can easily able to start the sending and receiving your email and fix the Outlook Data File Cannot be Accessed Error.
Also Read: Your PC Ran Into a Problem and Needs to Restart
Method 4 – Manually Create IMAP or POP3 Email Account
As we already discussed about the method to create new account or profile by an auto account setup method. But apart from this, there are another good method which can be followed to resolve the outlook data file which can’t be found the issue by simply creating a POP3 email account manually. The steps are nearly similar to each other with a light variation. So just simply follow them to fix Outlook Data File Cannot be Accessed Error:
- Firstly, you need to make a click on the start button and then simply click on the option of Control Panel.
- After this, in the mail set up outlook box, you need to make a click on the Show Profiles option.
- Then, in the mail dialog box on the General tab, make a click on the Add button.
- After this, a new profile dialog box will open.
- In that box, you need to type your name and then make a click on the Ok button.
- In the option of Add new account option or in the dialog box, you need to manually select the configure server settings or the additional server types. Then make a click on the next option to continue the process.
- Now, you need to select the service dialog box will open. In it select Internet E-mail. After this, make a click on the “Next” button again.
- In the dialog box of Internet email settings, you need to type the details of your email account.
- Then make a click on the text Account Settings which help you to test your account.
- Next, you need to make a click on the Existing Outlook data files and then make a click on the browse option.
- In the Outlook dialog box, you need to open the data file browser and then select the Outlook data file which you located previously and then make a click on the “OK” button.
- Then make a click on the “next” button again.
- After this, you need to make a click on the “close” button of the test account settings dialog box.
- After doing all this, simply make a click on the “Finish” button.
Advanced Fix Method
After the creation of new outlook profile, you need to make sure that your old outlook profile is deleted or removed completely. And also, you need to make sure that you are no longer receiving any type of errors or corrupted PST email to the newly assigned location which you created.
The main reason of the “Outlook data file cannot be accessed” error is the corrupt outlook profile. But you don’t need to worry because all the above given methods will definitely be helpful for you and help you to solve this problem. Above we provide the full proved solutions related to your Outlook Data File Cannot be Accessed Error problem.
Also Read: Selected Boot Image Did Not Authenticate
Conclusion:
We hope that you liked this article. In the above given article we had shared all the possible details and methods which help you to fix Error 0x8004010F: Outlook data file cannot be accessed. With the help of above given methods you are able to fix this Outlook Data File Cannot be Accessed Error issue easily. If this article helps you to fix this issue, then simply tell us by dropping a comment in the comment section below and also share this article with your friends and family so that they are also able to fix it easily.