

DHCP Lookup Failed in Chromebook: Sometimes, while using the Chromebook, we face an error which is DHCP lookup failed and this error takes place when we are trying to connect with a network and it happen because of an outdated OS, or also because of the corrupt firmware of the router which is also one of the reasons of this DHCP error. Also, sometimes this error takes place because of your network frequency which was not supported by your device.
Basically, the users face this error when they try to connect with a new network. There are lots of users in the world who encounter this error for a long period of time.
Before telling you more details and solutions for this error to fix the DHCP failure, you need to try to connect to another network to check out the issue with the hardware of your Chromebook. Also, you need to check that the other devices which were connected with the network are working properly or not.
DHCP Lookup Failed in Chromebook – How to Fix
If you are using a device that was provided by your company or organization then, first of all, you need to ask your IT head regarding this error because sometimes, devices are restricted to connect with another network because of security reasons. Also, you need to ensure that your network was not set to use any of the hidden SSID.
How to Fix DHCP Lookup Failed in Chromebook?
Apart from these details, if you are willing to use a VPN then you must need to disable the VPN client. If you are using any of the Wi-Fi extenders then, first of all, remove it as the Chromebooks. Also, If your device was made for the use of a particular country like only in the US and you are trying to use it in another country then it may be that your device faces the compatibility issue.
Solution 1: Restart Your Networking Equipment and Chrome
If you are facing a DHCP error then you don’t need to worry about it because sometimes this error takes place due to a temporary glitch in communication or software. To fix this issue, one of the best methods is to simply restart your networking device.
- You need to shut down your Chromebook completely.
- Also, you need to power off your router and also unplug the source of power as well.
- Now, simply wait for 30 to 40 seconds and then plug it back to the power source.
- You need to wait for the stabilization of the lights of your modem.
- Now, you just simply need to turn on your Chromebook and then simply connect your system with the Wi-Fi network and then check that the DHCP Lookup Failed issue still exists or gets fixed.
Also Read: Wiseview for PC
Solution 2: Change the Sleep Settings of Chromebook
We clearly state that the Chromebook is having a bug where if your Chromebook gets in sleep mode then after waking it up, your device can’t be able to connect with the network and you will see a DHCP lookup failed Chromebook message on your display at the time when your Chromebook won’t connect to wifi.
So, in this case, you are required to change some settings of sleep mode in your Chromebook where your Chromebook doesn’t get into sleep mode and it will solve your issue. To know the complete process, you are required to read the below-given steps properly.
- First of all, you need to open the settings of your chromebook.
- Then, simply click on the Device and then click on the “Power” option.
- After this, you need to open the dropdown menu when your system is idle and then simply select the option of Turn off Display but Stay Awake.

- After this, you need to open the dropdown of When Lid is Closed and then select the option of Stay Awake.
- Now, simply save the changes and then simply exit the setting menu.
- After this, you need to restart your device and then try to connect your network to get to know if that issue gets fixed or not.
Also Read: The Handle is Invalid
Solution 3: Reconnecting to the Wi-Fi Network
It may be that there is an issue with your network due to which the connection between your device and router doesn’t get stable properly. So, if you want to get rid of this Chromebook dhcp lookup failed error then you need to forget the network first and then simply try to reconnect with your network again. You need to know that when you do this process, you are required to enter your internet password again to connect with your network. Also, you will get to know about how to find IP address on Chromebook.
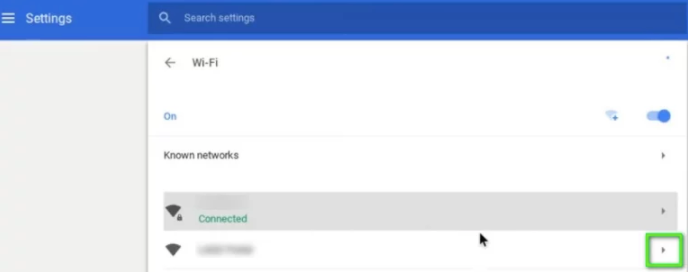
- First of all, on the home screen of your system, you need to look at the bottom right corner of your screen where you will see an icon of Wi-Fi on which you need to make a click.
Click on the Name of the Network
- Then you need to click on the option of the name of the network.
- Now, simply click on the gear icon which will open the Network Setting window.
- After this, click on the Wi-Fi option.
 i
i
- Now, simply disconnect from the network, and then you need to click on the right arrow of the network which you are willing to forget.
- Then click on the option of “Forgot Button”.
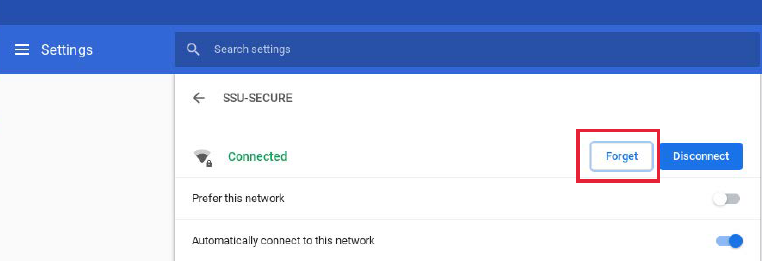
- After doing all these steps, you need to restart your system and then simply try to connect with your network again to check that it works fine or not.
Also Read: Windows10Upgrade Folder
Solution 4: Use Google Name Servers for the Network
You need to know that the DNS server will play a huge role in the translation of the IP addresses into the hostnames. If your device is not able to query the DNS server then it will start showing you a DHCP failed error. So, in this case, you need to switch to the Google Name Servers which will be able to solve this issue.
- First of all, you need to open the settings of your Chromebook.
- Now, in the network section, you need to make a click on the Wi-Fi.
- After this, you need to make a click on the right arrow of the network which was creating a problem.
- Now, you need to scroll down and then simply open the dropdown menu of the Name Servers.
- Then, you need to select the option of “Google Name Servers”.

- After this, you need to connect the network and then simply check that the DHCP issue gets fixed or not.
- If that issue still exists then you need to restart your system and then again repeat the same process in the network setting, select the Automatic Name Servers option.
- After this, you need to again connect to the network and then simply check that your Chromebook is still showing an error or not.
- If yes, then you need to open the Network Setting option of your connection and then you need to disable the Configure IP Address Automatically option.
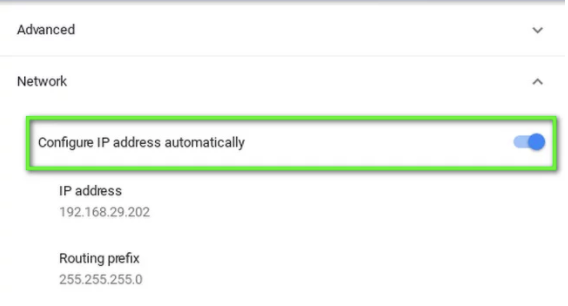
- Now, you need to set a manual IP address of your device according to the IP scheme and then you need to simply restart your Chromebook.
- After restarting, you need to simply check that your device is showing DHCP error or gets fixed.
Also Read: pii_email_654fbfc0ac64aec32e9c
Solution 5: Extend the DHCP Range of Addresses of the Network
There are various devices which are not able to connect to a DHCP server. If the limit of the devices which were connected to the DHCP servers gets reached then you will start falling the DHCP error.
So, if you are facing this error then you need to remove some of the devices from your network by which you are able to increase the limit of the devices which can be able to connect with the network to solve this issue. If you want to know the process then read the below-given steps properly.
- First of all, you need to open the web portal of your router in a web browser and then simply make a login by using your sign-in credentials.
- After this, you need to search for the DHCP tab in the setting menu.
- Now, you need to increase the DHCP IP range and if the upper range is 192.168.1.200 then you need to increase it to 192.168.1.253. Also, some of the routers also specify the device number which can be connected to the Wi-Fi Network.

- Now, you need to simply save the change and then simply exit from that portal.
- After doing all these steps, you are required to simply try to connect with the network to check for the issue. If the issue gets fixed then it is really good but if it still exists then you need to follow the next method which we are sharing below.
Also Read: Coursehero Downloader
Solution 6: Change the Frequency Band of Your Wi-Fi Network
If you are evolving around the speed and network standards, you need to know that the routers are able to broadcast at a higher frequency like earlier. Also, if your router is broadcasting at a high frequency which is not supported by your device then you may start facing the DHCP failed error. So, if you want to fix this problem then read the below-given steps carefully.
In some of the cases, when you switch a network frequency which was suggested by your device then it may be able to solve this issue. But, you need to know that the instructions may be different as per the router model which you are using.
- First of all, you need to open the web portal of the router which you are using and then you need to enter your login details.
- After this, simply lookup for the wireless setting option.
- Now, you need to change the band like if you are selected the 2.4GHz then you need to switch to the 5 GHz and if you have previously selected the 5 GHz then you need to switch to the 2.4GHz.
- Then, you need to simply save the changes and then simply exit the portal.
- When you complete the above-given process then you are required to simply restart your system then try to connect with the network and check that the issue gets fixed or still exists.
Solution 7: Update Chrome OS of Your Chromebook
You need to know that your operating system gets updated continuously. If the chrome OS of your device is outdated then it may be the reason behind this issue. So, in this case, you are required to update the OS of your device to the latest version which may be helpful for you to fix this issue. To know the complete process then follow the below-given steps.
- First of all, you need to connect your device with the internet by using an ethernet cable or by Wi-Fi.
- Now, you need to open the Settings of your Chromebook.
- Then, on the left side of your windows, you need to make a click on the option of About Chrome OS.
- Then, make a click on the option of Check for Updates.

- After the update, you need to restart your device.
- Now, simply try to connect with the network which was creating the problem, and then simply check that the issue still exists or not.
Also Read: Screen Rotation Galaxy S7
Solution 8: Reset Your Router/Modem to Default Settings
Sometimes, corrupt firmware of the router may be the main reason behind the DHCP issue. So, in this case, you can fix this issue by factory resetting your modem or router. Basically, it is not a complicated process and it will easily help you to solve lots of issues with the network. Because of the diversity, it is not possible to use all the steps to reset the modem or router but the process is mostly the same.
There are mainly two different methods which help you to reset your modem or router. The first one is by using the button of the device. To know the process, read the below-given steps:
- First of all, if your modem is powered off then you need to power on your modem.
- Then, you need to search for the Reset button which is located at the bottom backside of your modem.
- After this, you need to click on the reset button for 30 seconds.
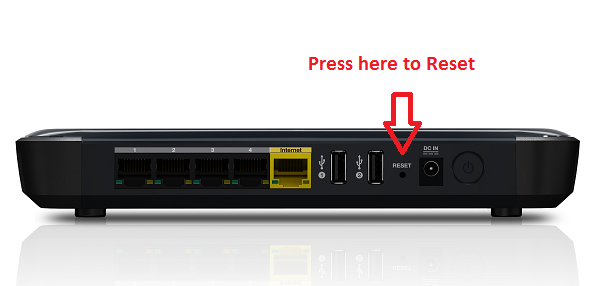
- After this, simply release the power button and then simply wait to reset or power on completely. Generally, this process takes 30 to 60 seconds.
- If you didn’t find any button on your device then you need to manually check for the power button which will be able to reset the device.
Also, you can use the web portal of your device to complete the reset process of your device.
- First of all, you need to open your web browser and then simply search for the default gateway.
- Now, you need to enter your details to access the web portal.
- After this, you need to search for the reset option. Generally, it is available in the General or System tab. Simply find it out and then click on the reset setting option.

- Now, you need to confirm the reset and then simply wait for the completion of the reset process.
- When your router or modem gets reset successfully then you need to simply restart it and then try to connect it with the network to find out that the DHCP error gets fixed or still exists.
Also Read: Driver power State Failure
So, hopefully, we have shared all the best methods which help to fix: DHCP Lookup Failed in Chromebook. If these steps are not helpful for you then you can also try to upgrade the firmware or your router. If the issue still hasn’t been fixed then you need to simply visit the authorized technician or your Chromebook and ask them to check the Chromebook for any of the issues related to hardware or software.
If this article is helpful for you and helps you to fix this issue then simply share this article with your friends and others so that they can also be able to know these methods. Also, if you face any issue or problem then simply drop your query in the below-given comment section.